Showing results for tags 'tutorial'.
Found 13 results
-
UNLIMITED GOOGLE DRIVE STORAGE -Using telegram bot- 1. Go to [Hidden Content] 2. Type /unlimited [email protected] 3. Go to drive.google.com and then you will find some shared drives called Unlimited Drive (with you as the manager) 4. Done, now you got it Credits : EviLeaks Paiwan nalang ng feedback, ss or Reactions, Tnx
-

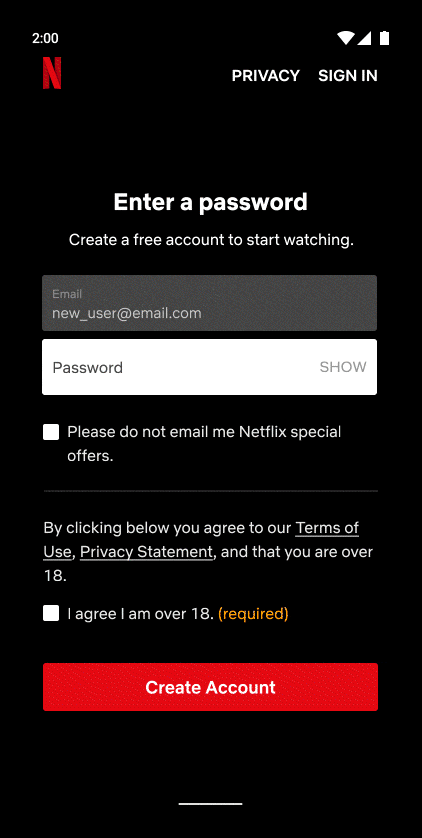
tutorial How to Create NETFLIX Premium Account For Android Users
L-Kira posted a topic in Android Apps
[Hidden Content]
- 168 replies
-
- 16
-

-

-
Edit Cookie In Chrome Android In this Tutorial We Edit/Import Chrome-Android Cookies Prerequisite are: 1. We Need a Pc 2. We of course we need Android with chrome 3. ADB drivers On Windows Universal Adb Driver Can be Downloaded From here [Hidden Content] Brief 1. You can edit Cookie On chrome-Android 2. I am using Here Netflix Cookie As i only have Netflix Cookie 3. Netflix Video Can't be run on any Android Browser -( As it needs WidevineCDM ) 4. You can Use it For Other Platform Alternative You can use Yandex Browser Or Kiwi Browser As They Support Chrome Extension [Hidden Content] Any Doubts or Problem Let me know in comment
- 12 replies
-
- 2
-
-
- cookie editor
- edit cookie
- (and 3 more)
-
1. Copy the below Code ? 2. Paste this code in Notepad and save it as Hackershub.bat 3. Now, do right click on the bat script which we have created and run as adminstrator. 4. Wait for 30 seconds, BOOM! your office has been activated...
-
Libreng Text to naka wifi kaman o naka free data working to ? Link: [hide][Hidden Content]] God Bless and Stay Safe ??
-
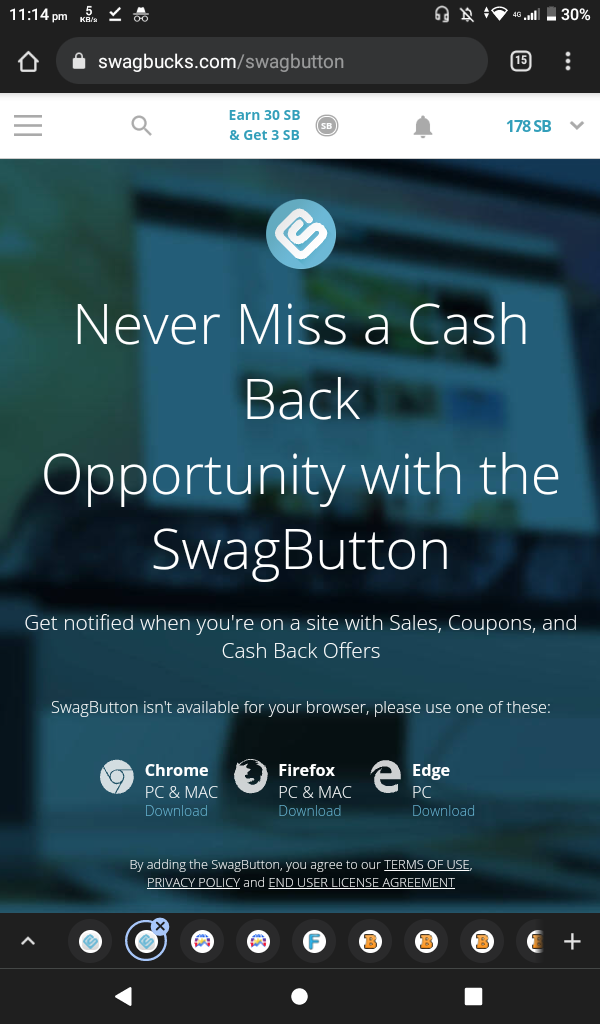
LINK HERE Ways of earning: Cash Out: PayPal Payoneer Amazon Pastepeso link: [Hidden Content] According to my friend this is legit? Also, don't forget to have the swagbutton extension so you can keep up with your surveys!!
-
Unlimited RDP Method Maximum limit: 6GB Ram Steps [Hidden Content] 1) Go to [Hidden Content]. com/ 2) Click on get started. 3) Select your desired configurations. 4) Sign up and use [Hidden Content]. ws/ to type fake details. 5) Bingo! You will receive the order receipt. 6) Go to your order section to know the login password.
-
[Hidden Content]
-

tutorial How To Watch Netflix Content For Free On Android 2020
Oranek posted a topic in Internet Tricks
[Hidden Content] -
Here are the steps to have Windows 10 show the correct registered owner and organization information on your computer. Windows 10 by default no longer lets users set their registered owner and organization information during installation. Instead, the operating system uses default information, such as your email address if you’re using a Microsoft account, “user name” and “org name” when starting with a local account, or “Windows User” if you’re installing an Insider preview build. About Windows: Insider preview (left), Local account (middle), Microsoft account (right) Typically, you’ll only see this information on About Windows, but while there are still a lot of apps that look for these names to customize the experience on Windows 10, or your computer is part of an organization, it’s a good idea to add the correct information. In this Windows 10 guide, we’ll walk you through the steps to change the registered owner and organization information on your PC using the Registry. How to change registered owner and organization info using the Registry Important: As always, this is a friendly reminder warning you know that editing the registry is risky, and it can cause irreversible damage to your installation if you don’t do it correctly. It’s recommended to make a full backup of your computer before proceeding. 1. Use the Windows key + R keyboard shortcut to open the Run command. 2. Type regedit, and click OK to open the Registry. 3. Browse the following path:HKEY_LOCAL_MACHINE\SOFTWARE\Microsoft\Windows NT\CurrentVersion 4. Inside the CurrentVersion (folder) key look for the RegisteredOwner String Value. If you don’t have the string, you’ll need to create it: 5: Right-click on the CurrentVersion (folder) key, select New, and click on String Value. 2. Name the new String Value RegisteredOwner and press Enter. 3. Double-click the RegisteredOwner String Value and enter the registered owner information, which usually it’s just your name. 6. Click OK. 7. Inside the CurrentVersion (folder) key look for the RegisteredOrganization String Value. If you don’t have the string, you’ll need to create it: 8. Right-click on the CurrentVersion (folder) key, select New, and click on String Value. 2. Name the new String Value RegisteredOrganization and press Enter. 3. Double-click the RegisteredOrganization String Value and enter the organization name. 9. Click OK. 10. Close the Registry to complete the task. Once you completed the steps, you can check the new information by using the Windows key + R keyboard shortcut and running the winver command to see About Windows with the new information. (Source: windowscentral) Happy learning!
-
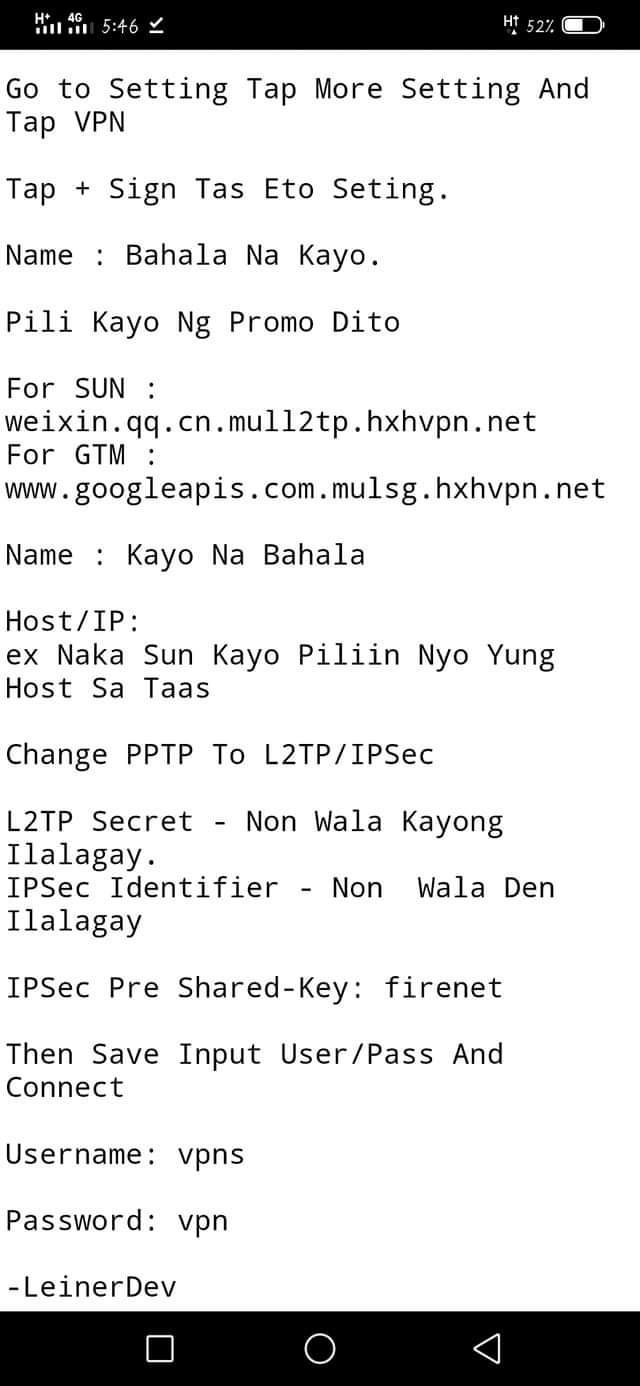
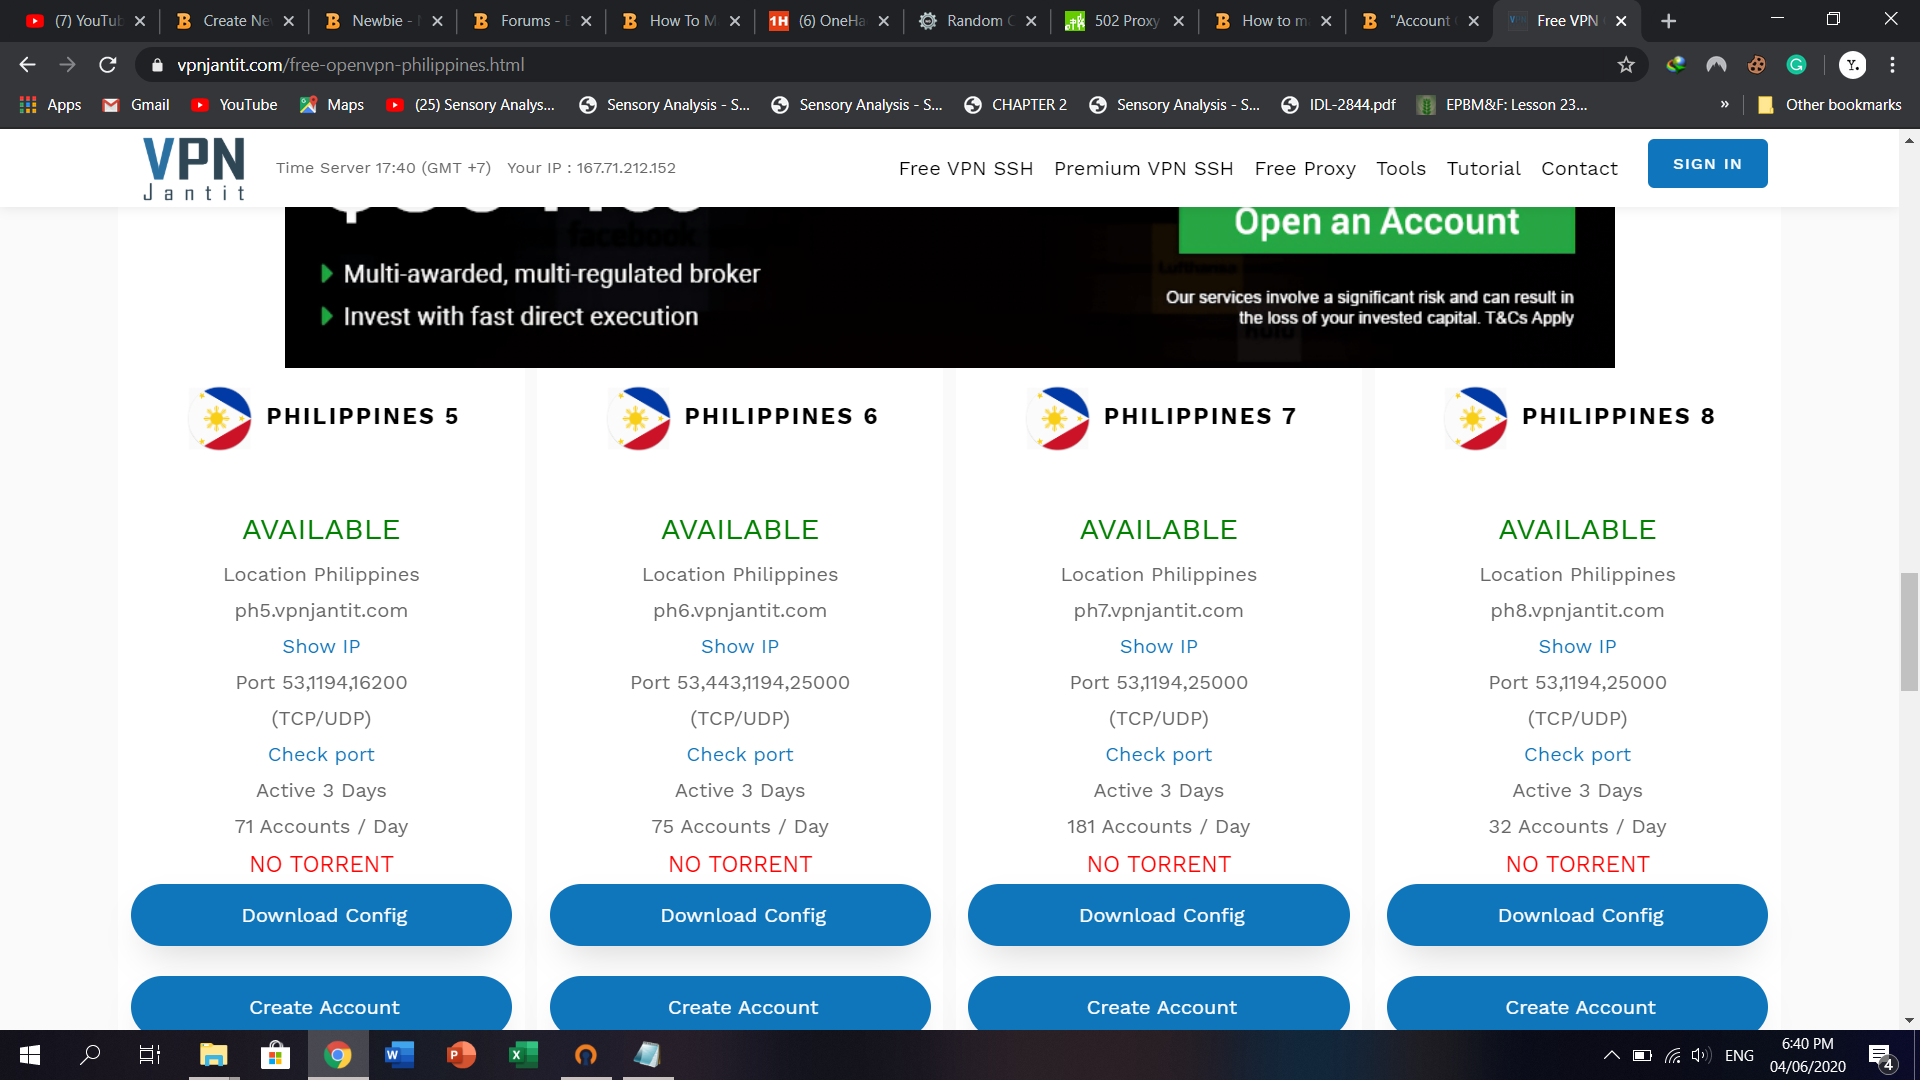
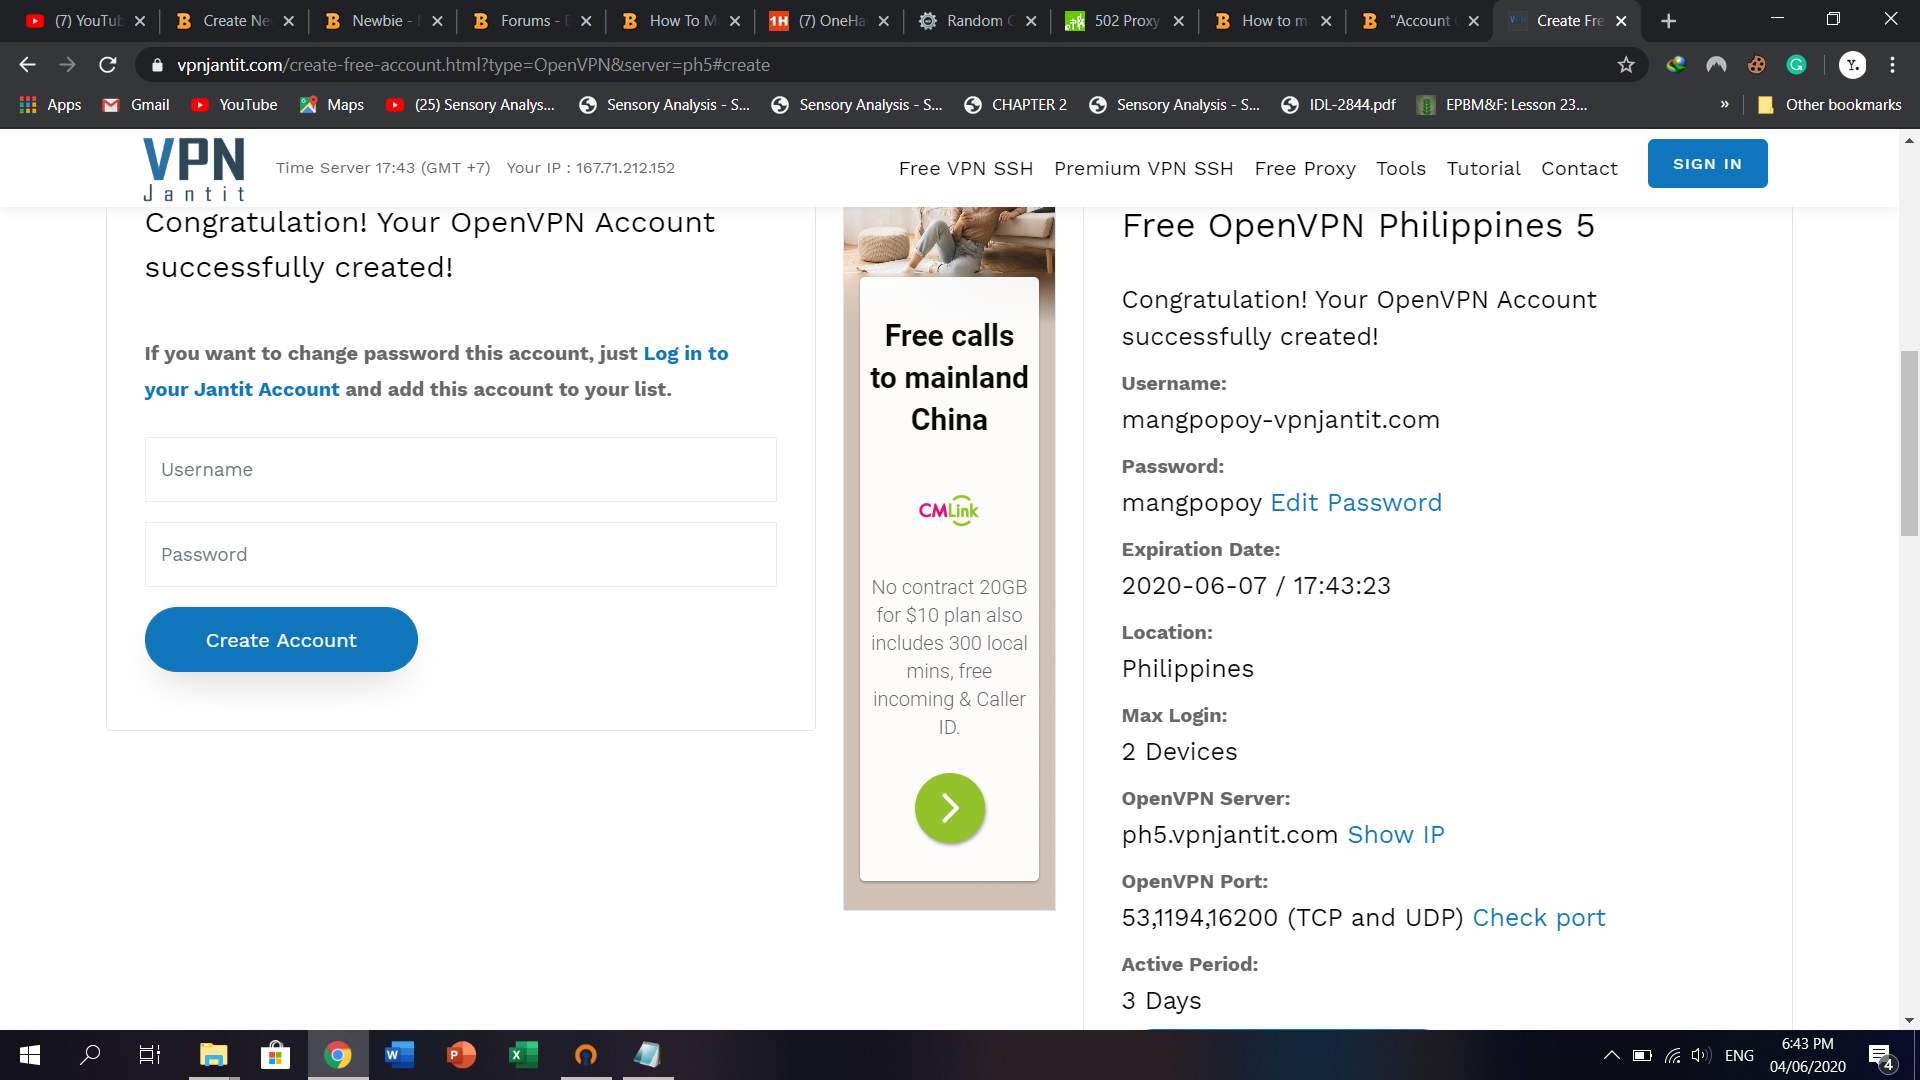
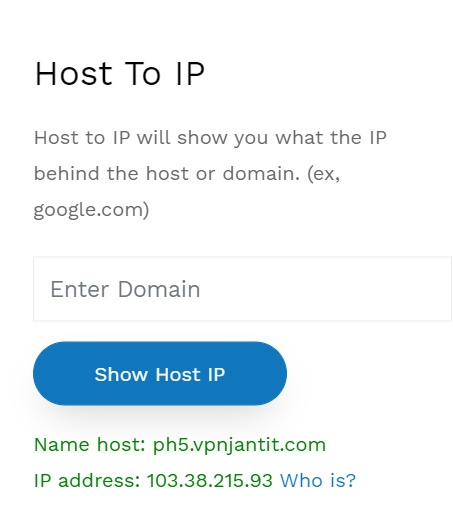
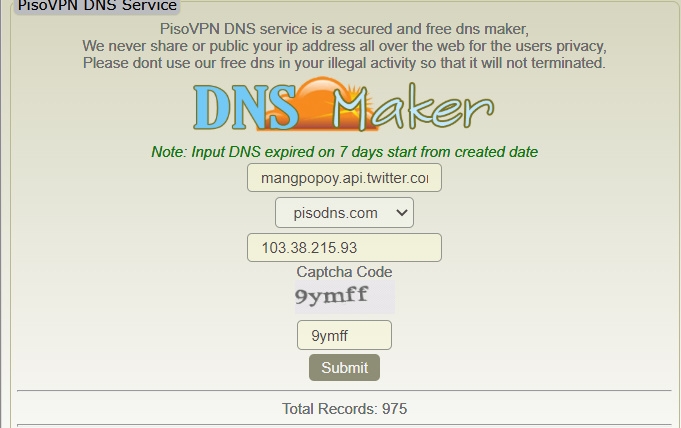
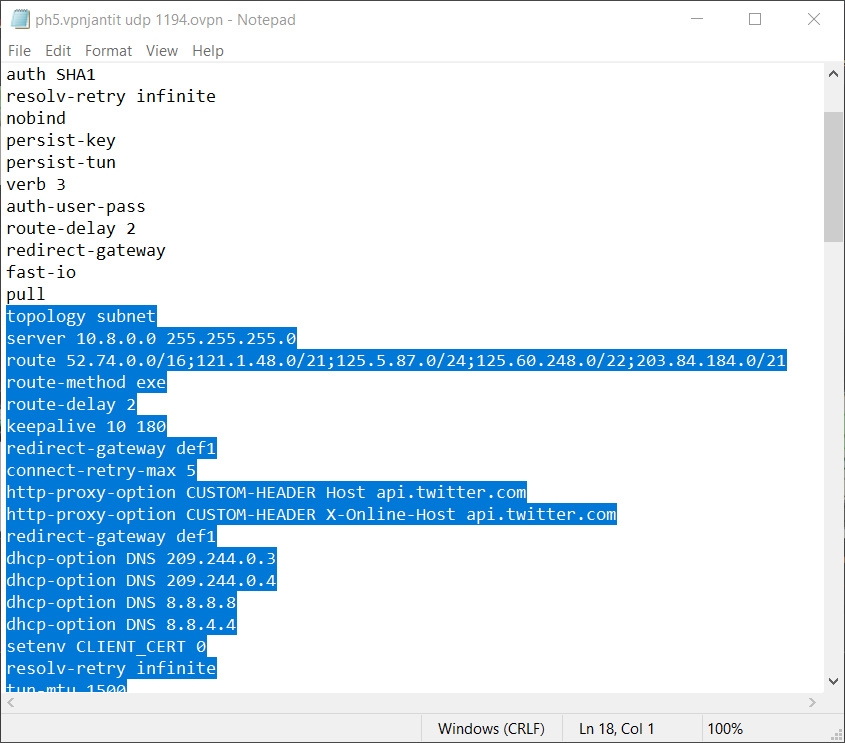
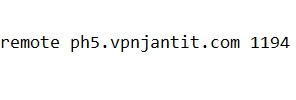
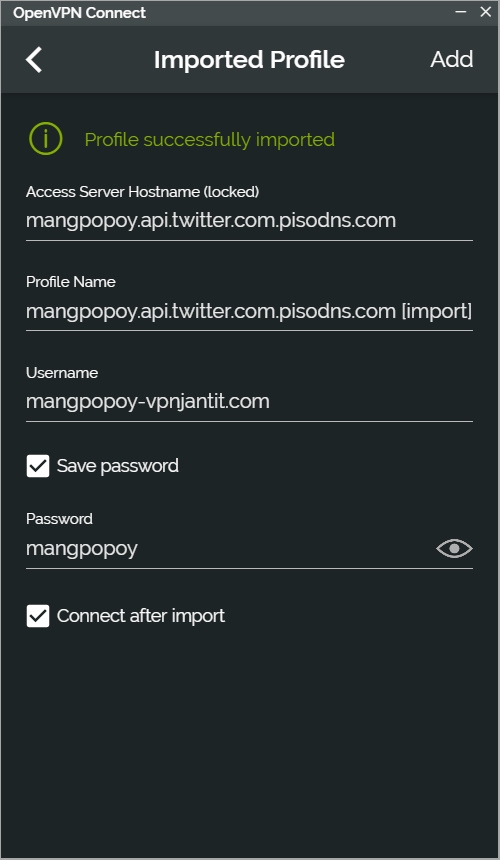
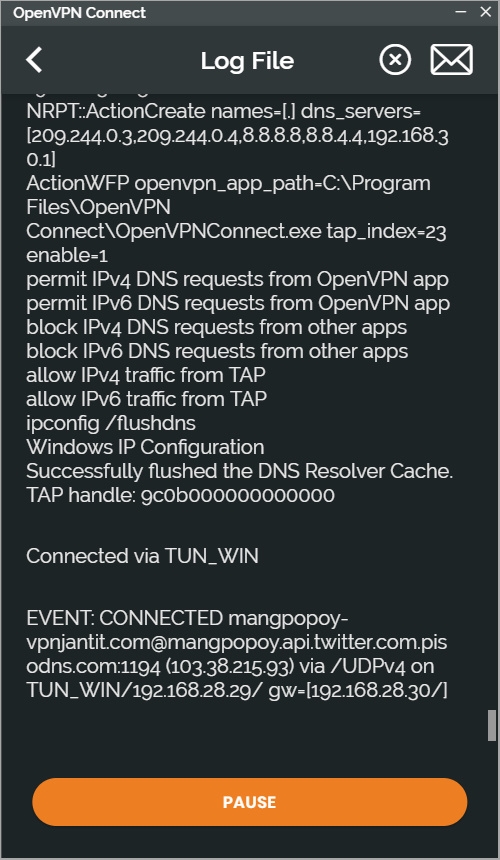
 Hello Guys welcome to my thread! I'm newbie in this forum so this is my first tutorial thread. I'm gonna teach you how to create your own OVPN UDP Config. Take note this is only for those who are registered to GIGASTORIES PROMO. Let's move on to the Procedures Procedures: 1. First of all, create your own OVPN account on any sshsites. Andaming nagsisilabasang sshsites fastssh, vpnjantit, globalssh atbp. as for now gagawa tayo ng account sa vpnjantit. (Best servers para sakin pag gumagawa ng account is JP, PH and SG). Download Config para sa OVPN config and Create tayo ng account after natin mag create ng account proceed tayo sa next step. 2. so for the next step i convert natin yung Host to IP. Pagkatapos niyan is i coconvert natin yung IP address to DNS sa PISONET dns- Click me. Sa "IPv4 address" dun natin ilalagay yung IP, for the Hostname naman is yung bug+payload, fill the captcha and click submit. example: mangpopoy.api.twitter.com mangpopoy-BUG api.twitter.com- payload After niyo maconvert copy natin yung created domain natin. 3. Next is i eedit natin yung config na nadownload at ilagay niyo yung payload format.txt file na naka attached sa baba replace niyo yung "remote hostname port" ilagay mo yung created domain natin "mangpopoy.api.twitter.com" After that save natin yung file and import natin sa OVPN APP or PC fill mo natin yung password at username. DONE! ENJOY! payload format.txt
- 12 replies
-
- 3
-

-
-
-
- gigastories
- udp config
- (and 1 more)
-
sana makatulong feedback nalang para ganahan.
-
Go to [Hidden Content] Sign up/Create account. Random account number lang lagay niyo tapos sa mobile number yung legit na mobile number niyo at email. pagtapos wait kayo ng 2 days sa email niyo.


.thumb.gif.a605a6607860a07308b406d475b1ef18.gif)